
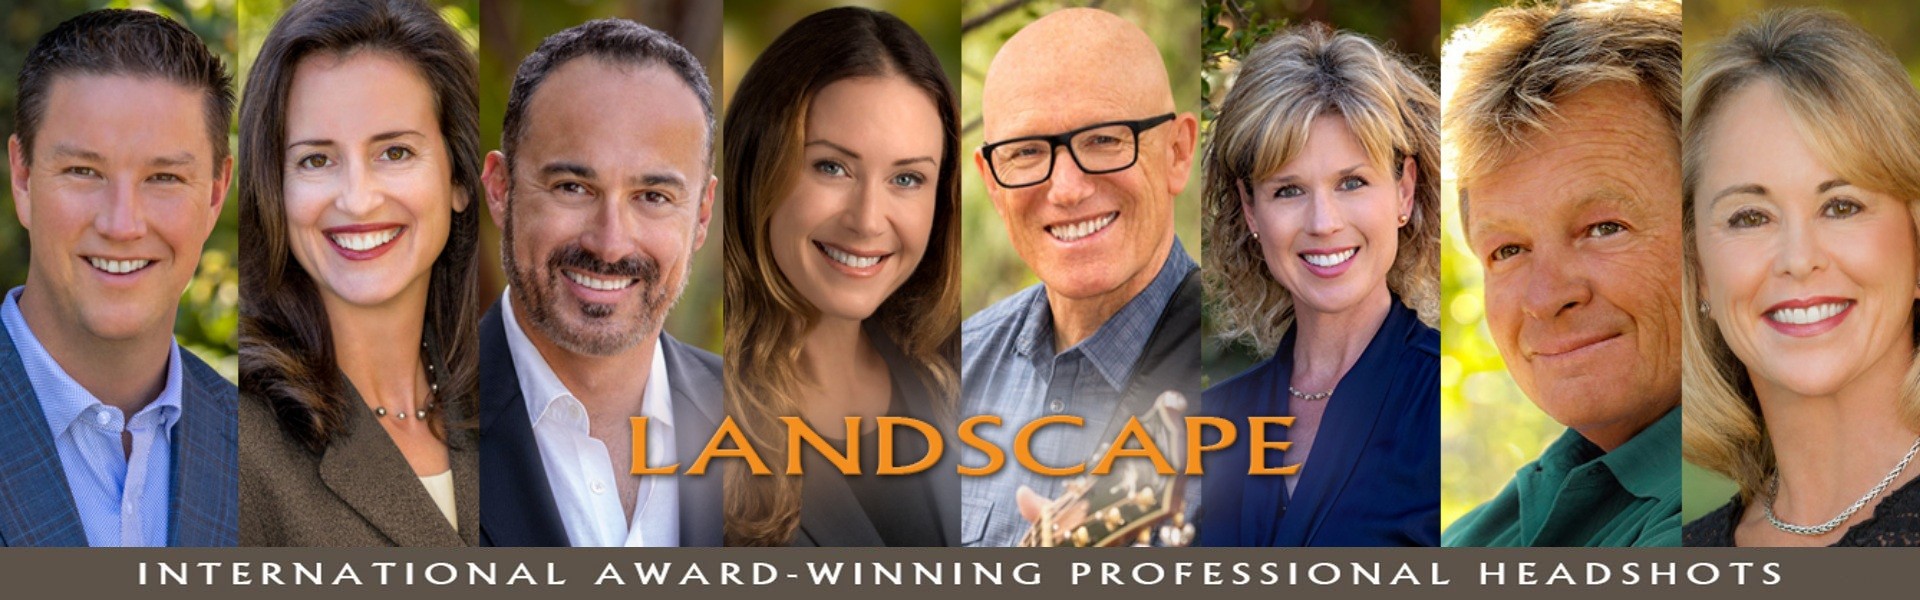


Create Your Own Headshot
Photography Tips for the Nonprofessional
Create Your Own Headshot is a Blog Post designed specifically for Dynamic Campus.

How to Create Your Own Headshot is a drastically reduced version of Mark Jordan’s lecture to professional photographers. We’ve adjusted it for the nonprofessional. Please feel free to employ the photography tips you feel are relevant and ignore those who feel are not.
Once you send us your headshot, we will be removing you from the background and placing you on preselected background, which will be identical for all Dynamic Campus headshots.
Regardless of how confident you feel in creating your own headshot, we’re confident that after taking your time to absorb our Create Your Own Headshot photography tips, you will find the process fun and rewarding.
Enjoy!
First, a few preparatory thoughts.

NO SELFIES
If you’re thinking “selfie,” you’re not thinking. Suffice it say, your professional reputation demands more than a selfie can produce. It’s possible to create your own headshot with a selfie, but not probable. We’ll leave it at that.
OBJECTIVE
Since the purpose of this post is to help you create an acceptable headshot of yourself (without resorting to a selfie), you will need someone to hold your camera and click the shutter. Please be sure to ask a friend to photograph you so that your only concern is relaxing and sparkling naturally.
CAMERA
The odds are that your camera of choice is your cell phone. I wish it weren’t so, but because cell phone cameras are today’s reality, I’ve constructed the following Create Your Own Headshot photography tips around this likelihood.
Having these brief introductory notes behind us, we’re ready to begin.
CREATE YOUR OWN HEADSHOT
Please note that I’ve divided your Create Your Own Headshot photography tips into three basic components:
A. Preparation – getting ready for your session.
B. Session – how to go about being photographed.
C. Finalization – the wrap-up.
In the interest of brevity and clarity, I’ve distilled decades of information regarding each component into bullet points of DOs and AVOIDs. Regardless of how brief and encapsulated we’ve designed these photography tips, I am convinced that when followed carefully, your resulting headshot should serve you well.
However, should you have any questions or need me to expound on any particular point, please know that no concern is too small.
A. PREPARATION
1. CLOTHING
• DO – choose little to no pattern. Simplicity is the key.
• DO – opt for a colored shirt over a white one (but is not imperative).
• DO – opt for darker colors for suits/jackets/dresses.
• AVOID – light colors and pastels for suits/jackets/dresses.
• AVOID – busy patterns and bright colors demanding the viewer’s attention (i.e., red, orange, chartreuse).
2. BACKGROUND
• DO – select a plain background with a single color or simple pattern.
• DO – be mindful that a “background” is called such because it must remain there – preferably unremarkable and out-of-focus.
• DO – choose a background where you’re able to stand with your back at ample distance from it. We advise no less than 12 feet.
• DO – select a background where the scenery in front of you is easy on the eyes.
• AVOID – busy, multi-patterned/colored backgrounds.
• AVOID – cramped, tight spaces where you have to stand too close to the background.
• AVOID – backgrounds where the scenery in front of you is glaring, making your eyes squint.
3. CAMERA/LENS
• DO – ensure your camera’s lens is clean – free of dirt, grease, and grime.
The following photography tips are for those who own a camera that offers custom settings:
• DO – choose the largest image/file size possible for your camera.
• DO – choose the RAW setting (i.e. if your camera offers this option).
• DO – choose the longest focal length of your lens. 200mm is ideal.
• DO – choose auto-focus and auto–exposure.
• AVOID – wide angle lens as it elongates the face and accentuates chin and nose.
4. LIGHTING
• DO – opt for natural, outdoor lighting.
• DO – choose a time of day where the lighting outside is soft and warm, which is typically that last hour of the day.
• DO – stand where your face is in non-direct sunlight (such as under a tree, patio cover, the shadow of a building).
• DO – choose fill flash (i.e. if your camera offers this option) to pop a touch of sparkle to your eyes and teeth.
• AVOID – standing in bright sunlight where eyes are squinting and the light is harsh (bright whites and dark shadows).
• AVOID – lighting your face with camera flash ONLY.
B. SESSION
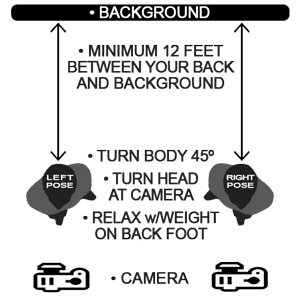
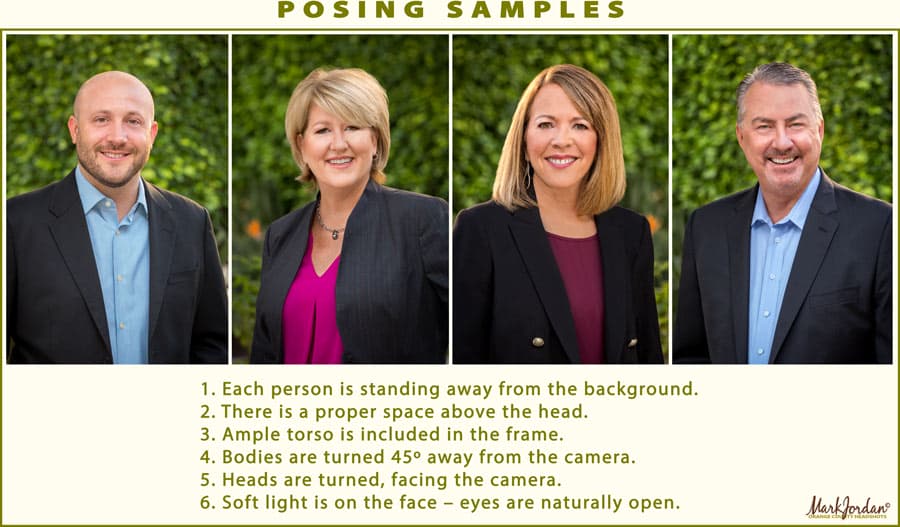
• DO – position your body away from the camera, turned at about 45º (try both left and right for variety and see what you like best).
• DO – stand and relax naturally with all your weight on your back foot. Front leg will have a relaxed, natural bend.
• DO – relax hands/arms at your side, or put in pockets if that feels natural.
• DO – turn head straight at the camera with eyes centered in the sockets, focused at the lens. This yields a trustworthy and credible persona.
• DO – for a natural feel, slightly tilt your head (possibly 10-20º) with the tilt toward your back shoulder (equals strength and confidence).
• DO – capture a range of smile intensity. If smiles don’t come naturally, simply lift your “apples” (i.e. cheeks) and firmly place your tongue on the roof of your mouth. A smile will unfold…
• DO – position your camera VERTICALLY (PORTRAIT orientation).
• DO – keep the plane of face parallel to cameras lens (especially if a wide angle lens is employed).
• DO – position the camera slightly higher than the nose so that you are not photographing under either the nose or chin.
• DO – include most of the torso, with space above space above the head.
• DO – relax, have fun, and enjoy the process.
• DO – create dozens of exposures – the more images from which you have to choose, the greater the opportunity of capturing your special sparkle.
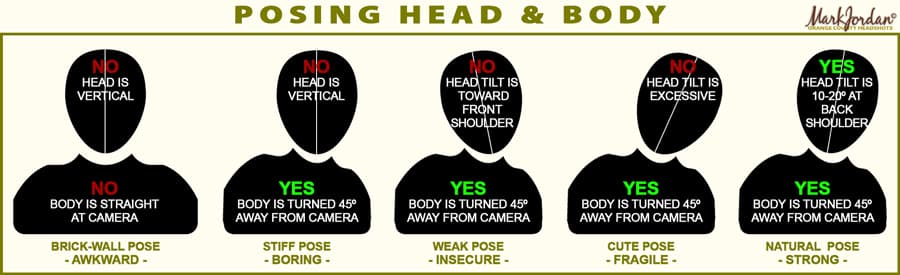
• AVOID – standing straight on at the camera like a brick wall. Only your face should be turned toward the camera (with a slight tilt…see example above).
• AVOID – photographing too low of an angle, which captures under the chin and nose.
• AVOID – photographing too high, which accentuates the forehead.
• AVOID – too large a smile where gums and bottom teeth show, and eyes squint.
• AVOID – turning head away from the camera, causing you to look through the corner of your eyes, which feels sneaky and dishonest.
• AVOID – tilting head toward the front shoulder, which communicates weak, scared and timid.
• AVOID – positioning hands at your core/crotch, which communicates being uncomfortable and unsure of yourself.
C. FINALIZATION
• DO – email us your final selection: OrangeCountyHeadshots@cox.net
• DO – include your NAME and CONTACT information.
Remember, should you have ANY questions regarding any aspect of our Create Your Own Headshot post, please know that no concern is too small.
Mark Jordan
Master of Photography
Photographic Craftsman
International Photography Hall of Fame & Museum
EPCOT Center World’s Greatest Photography Award
Family Portrait of Excellence & Dedication Award
International Loan Collection Award – 11 Time Recipient
Portrait Photographer of Excellence Award – America, Norway & Germany
Orange County Photographer of the Year
American Society of Photographers
Create Your Own Headshot
PRIMARY AREAS SERVED FOR BUSINESS PORTRAITS HEADSHOTS
Orange County Headshots Photographer, Mark Jordan Photography is internationally recognized,
and serves all of Southern California, including San Diego County, Los Angeles, and the Inland Empire.
For over three decades, Mark Jordan Photography (Orange County Family Portraits and Orange County Headshots) has served and created family portraits and headshots for the cities of Aliso Viejo, CA | Anaheim, CA | Brea, CA | Buena Park, CA | Corona del Mar, CA | Costa Mesa, CA | Coto de Caza, CA | Cypress, CA | Dana Point, CA | Dove Canyon, CA | Fountain Valley, CA | Fullerton, CA | Garden Grove, CA | Foothill Ranch, CA | Huntington Beach, CA | Irvine, Ladera Ranch, CA | Laguna Beach, CA | Laguna Hills, CA | Laguna Niguel, CA | Laguna Woods, CA | Lake Forest, CA | Los Alamitos, CA | Mission Viejo, CA | Newport Beach, CA | Orange, Placentia, CA | Rancho Mission Viejo, CA | Rancho Santa Margarita, CA | Robinson Ranch, CA | San Clemente, CA | San Juan Capistrano, CA | Santa Ana, CA | Seal Beach, CA | Shady Canyon, CA | Trabuco Canyon, CA | Turtle Rock, CA | Tustin, CA | Tustin Ranch, CA | Villa Park, CA | Westminster, CA | Rancho Mission Viejo, CA | Yorba Linda, CA